Nothing kills the vibe of a slick PowerPoint presentation faster than a giant file that takes forever to open. Thus, compressing the photos is a must. But shrinking them down doesn't mean you have to sacrifice how good your slides look. There are actually a bunch of ways to compress photos in PowerPoint, in 4 ways to keep your pics looking fresh without weighing down your presentation. So, keep scrolling!
Table of Contents
Part 1. Before You Compress Photos in PowerPoint - What to Know
Why You Should Compress Photos in PowerPoint?
Compressing photos in PowerPoint is beneficial for the following reasons:
- Smaller file size: Makes your presentation take up less space.
- Faster performance: Helps slides load and run more smoothly.
- Saves storage: Uses less space on your computer or device.
- Easier to share: Smaller files are quicker to send by email or upload online.
- Better for networks: Helps companies share and store files more efficiently.
- Faster backups: Smaller files save time when backing up data.
Can I Compress Photos in PowerPoint?
Yes. You can compress photos in PowerPoint with the help of the built-in compress picture tool, or by adjusting resolution. You can also compress PPT before inserting it into PowerPoint with a third-party tool.
Part 2. How Do I Compress Pictures in PowerPoint?
Here's how to compress pictures in PowerPoint Office 365 and with third-party tools. Pick a method that suits your needs:
1. Use the PowerPoint Built-in Compress Pictures Tool
PowerPoint's built-in Compress Pictures tool helps compress all photos in PowerPoint by reducing image file sizes to make presentations easier to share, open, and store. It's easy to access and functions best on high-resolution images, usually without noticeably affecting quality.
However, the tool doesn't operate on shapes or videos in PowerPoint for Mac and offers less control than professional image editors. Follow the instructions beneath to employ the Compress Pictures tool to compress an image in PowerPoint:
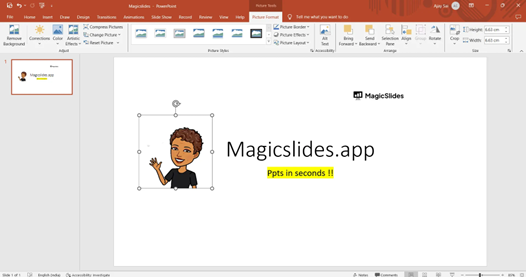
Step 1: Start PowerPoint and open the image(s) you want to compress. Click it. Use "Shift or Ctrl' to select multiple.
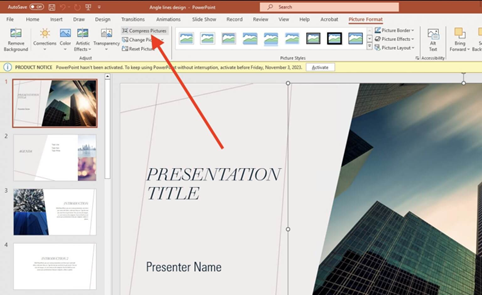
Step 2: Head to the "Picture Format" tab. Then, click "Compress Pictures" in the "Adjust" group.
Step 3: Choose whether to compress one image or all, and pick a resolution:
- Email (96 ppi): smallest file.
- Web (150 ppi): good for screens.
- Print (220 ppi): best quality.
Step 4: Tick mark "Delete cropped areas of pictures" if you want to remove hidden parts of cropped images (can't be undone).
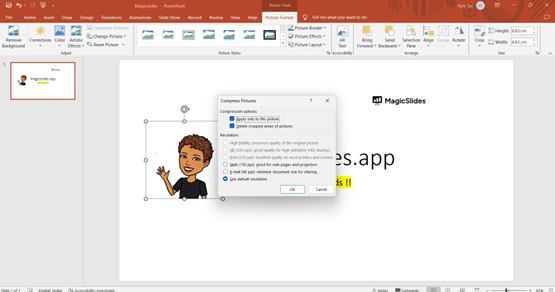
Step 5: Hit "OK." Save your presentation to keep the changes.
2. Adjust Image Resolution
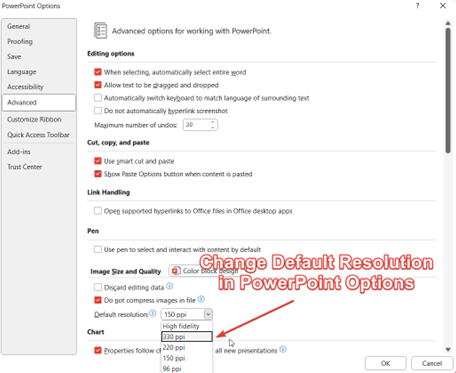
You can change the default image resolution in PowerPoint, which lets you control image quality and resize photos in PowerPoint. You can choose High Fidelity for the best quality or lower ppi settings to make smaller files.
However, increasing resolution won't fix low-quality images, automatic compression may still reduce quality, and slide size limits how sharp images can be. This setting also applies only to the current presentation. Follow the instructions beneath to adjust image resolution in PowerPoint to compress photos.
Step 1: Insert images into your PPT slide. Then, head to "File." Choose "Options." Tap "Advanced."
Step 2: Beneath the "Image Size and Quality," look for "Default resolution." Next, choose a resolution. Hit "OK" afterward:
- High Fidelity: Best quality, least compression.
- 330 ppi: For high-quality printing.
- 220 ppi: Great for large-screen presentations.
- 150 ppi: Good balance of quality and file size.
- 96 ppi: Best for small screens or when size matters most.
3. Compress Photos Before Inserting into PowerPoint
You can also employ a third-party plugin like ShortPixel to shrink image file sizes using smart compression while keeping good quality before inserting the image into PowerPoint. The tool supports formats like JPEG, PNG, GIF, and PDF, and can convert images to faster formats such as WebP and AVIF.
Moreover, it automatically optimizes new and existing images, works in the cloud, and integrates with platforms like WordPress and Shopify. It also offers backups, image resizing, and CDN support. However, it requires credits and an API key, uses storage for backups, and can't optimize existing WebP or AVIF files. Here's how to resize an image down without losing quality with ShortPixel:
Step 1: Add the "ShortPixel Image Optimizer" from the WordPress plugin directory.

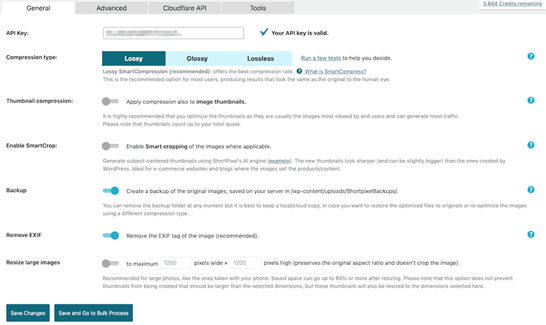
Step 2: Then, create a free account at shortpixel.com/wp-apikey to get your API key.
Step 3: In WordPress, head to "Settings." Then, choose "ShortPixel." Next, enter your key and validate it.

Step 4: Choose a compression type like "Lossy" (best balance), "Glossy," or "Lossless."
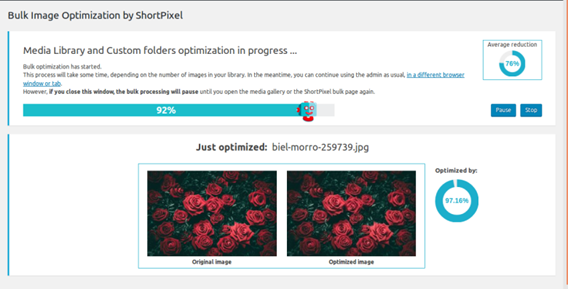
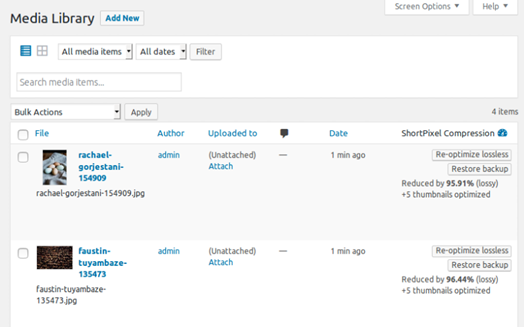
Step 5: New uploads are optimized automatically. But to compress existing images, head to "Media." Next, select "Bulk ShortPixel."
4. Compress PowerPoint Photos Fast with Pixpretty AI
PixPretty AI is another tool to compress pictures in PowerPoint online. But that's not all that this tool does. It's an AI-powered online app that can edit, refine, resize, and retouch facial features and body contours without manual steps.
The tool offers countless customization options for resizing pictures, and free templates, effects, presets, and filters, which you can employ to edit images. You can also convert image formats like WebP to PNG or JPG to PNG. In addition, PixPretty can transform, extend, or remove backgrounds and watermarks.
Start Compress for FreePart 3. FAQs on How to Compress Pictures in PowerPoint
Q1. Which PowerPoint versions have "Compress Pictures"?
The Compress Pictures feature is available in Microsoft PowerPoint and other Office apps when you insert an image. It's included in PowerPoint versions 2010, 2013, 2016, 2019, and 365 on Windows. In PowerPoint 365, the tab is called Picture Format.
Q2. How to compress all pictures at once?
To compress all images in PowerPoint, select any picture to reveal the "Picture Format" tab. Next, click "Compress Pictures" in the "Adjust" group. In the dialog box, untick "Apply only to this picture" to apply compression to all images. Then, choose a lower resolution like Web or Email for a smaller file size.
Q3. What's the difference between resizing and scaling?
Resizing and scaling both change an image's size, but in slightly different ways. Resizing changes the number of pixels, which can reduce file size. Whereas scaling changes the image's size on screen or slide, but if the resolution isn't adjusted, the image may look blurry or pixelated.
Conclusion
Compressing photos in PowerPoint is an easy way to make files smaller, faster, and easier to share. You can use the built-in Compress Pictures tool to compress photos in PowerPoint or adjust image resolution to balance quality and size.
Tools like ShortPixel can also shrink images before adding them to slides. But for a quicker and more advanced option, PixPretty AI is recommended. It compresses, edits, retouches, and improves photos with AI, and offers countless customization options, helping you create clean, professional presentations.


