


Are you wondering, “How do I remove the background of a picture without boring and technical details?” Hacking out the background is super useful for making clean graphics, funny memes, or standout social media posts. It instantly makes your pictures look sharper and more professional.
But instead of taking hours of fiddling or watching technical tutorials, Paint 3D can remove the background in a couple of clicks. There’s no hard knowledge required as well. Want to see how easy it is? Stick around, and we’ll lay out the steps for how to remove background in Paint 3D so you can start right away!

Table of Contents
Part 1: How to Remove Background in Paint 3D?
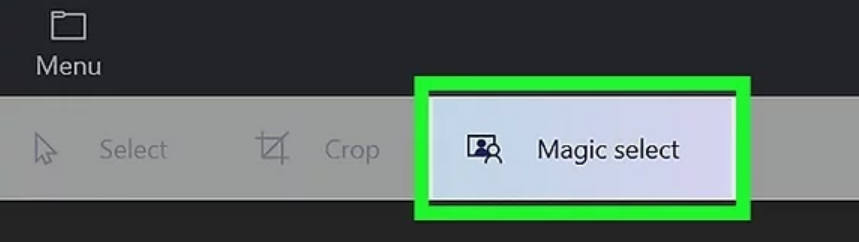
Paint 3D, a free application on Windows 10/11, has a “Magic Select” tool to remove backgrounds. It is an AI-enhanced option that enables one to select and isolate elements of a picture effortlessly. The tool identifies the edges and marks the object on the image by just sketching a box around the section you wish to highlight.
The selection may then be refined by using simple brush strokes to add or remove parts. Afterward, it is possible to move, copy, or remove the chosen object from the backdrop, which can be deleted or replaced (where necessary). To demonstrate the step-by-step procedure of how to remove a background in 3D Paint, we’re going to use the Magic Select tool:
Step 1: Prepare Your Canvas
Before you learn to remove background in Paint 3D activate the “Transparent Canvas” option in Paint 3D. So, the background stays clear instead of turning solid white. To do so:
- Head to “Menu” in Paint 3D. Then, choose “Open.” Select “Browse files.” Open the image whose background you wish to remove.
- Click “Canvas” in the menu above. In the right panel, switch on the “Transparent Canvas.”

Step 2: Initiate Magic Select
Next, execute the Magic Select tool. To do so:
- Click the “Magic Select” icon in the toolbar. A box will appear around your image.
- Resize it to fit closely around the object you want to keep. Then, click “Next” in the right panel.

Step 3: Refine the Selection
Paint 3D will highlight the subject in blue, but it may not be perfect. So, here’s what to do to refine the selection:
- Use “Add” to include missing parts or “Remove” to erase unwanted areas by dragging your cursor.
- When the selection looks right, click “Done.”
Step 4: Isolate and Erase the Background
Next, here’s how to remove a background in 3D Paint:
- Your object is now separate. Drag it slightly away from the background.
- You’ll see two layers. The object and the background.
- Select the background with the “Select” tool (first icon in the toolbar).
- Press “Delete” to remove it. This will leave a transparent (checkered) area.
- Move your object back to the center of the canvas.

Step 5: Save Your Image with a Transparent Background
Here’s how to save transparent image in Paint 3D without a background:
- Click Menu (top-left). Then, select “Save As.” Choose “Image.”
- In the save window, select “PNG (*.png)” (JPEG doesn’t support transparency).
- Tick mark the “Transparency” box. Name your file. Hit “Save.”


Part 2: Tips for Better Background Removal
Magic Select is a great tool, but its efficacy is dependent on your image and its use. Then, to learn how to remove background in Paint 3D with outstanding results, here are several tips:
- Start with the Right Image
Make sure that there is a good contrast between the subject and background for maximum effectiveness. For instance, a person in a dark suit against a light colored wall is easy to manage, whereas blonde hair on a beige background at the beach is difficult. Clear contrast makes it easier for Magic Select to detect edges, giving you a cleaner selection with less fixing needed. - Master the Refining Steps
Rushing through the “Add/Remove” step often leaves rough edges. To achieve a cleaner result, zoom in on complex areas, use a smaller brush for fine details like hair, and employ short strokes instead of long pulls. This gives you more control and a polished finish. - Don't Settle for the First Try
The initial attempt with Magic Select might not be ideal. Thus, don’t be afraid of having to undo and adjust the bounding box to be more appropriate. In the case of a complicated subject, and the AI leaves some details out, then you can always do a cleanup of the remaining background using the Select tool. - Leverage an External AI Tool for Perfection
For quick photo touch-ups and refining that Paint 3D doesn’t support, try an AI tool like Tenorshare PixPretty. It is able to improve several images simultaneously, smooth skin, alter body shape, and fix facial features with the help of presets. One can also add filters and colors to create a sleek and trendy appearance in portraits, wedding photos, fashion photos, or even ID pictures. Experiment with New Backgrounds
After you strip the background off, you can replace it with something better with Paint 3D. You can apply textures such as stone or glitter, insert your own image (beach, cityscape, etc.) in the Stickers menu.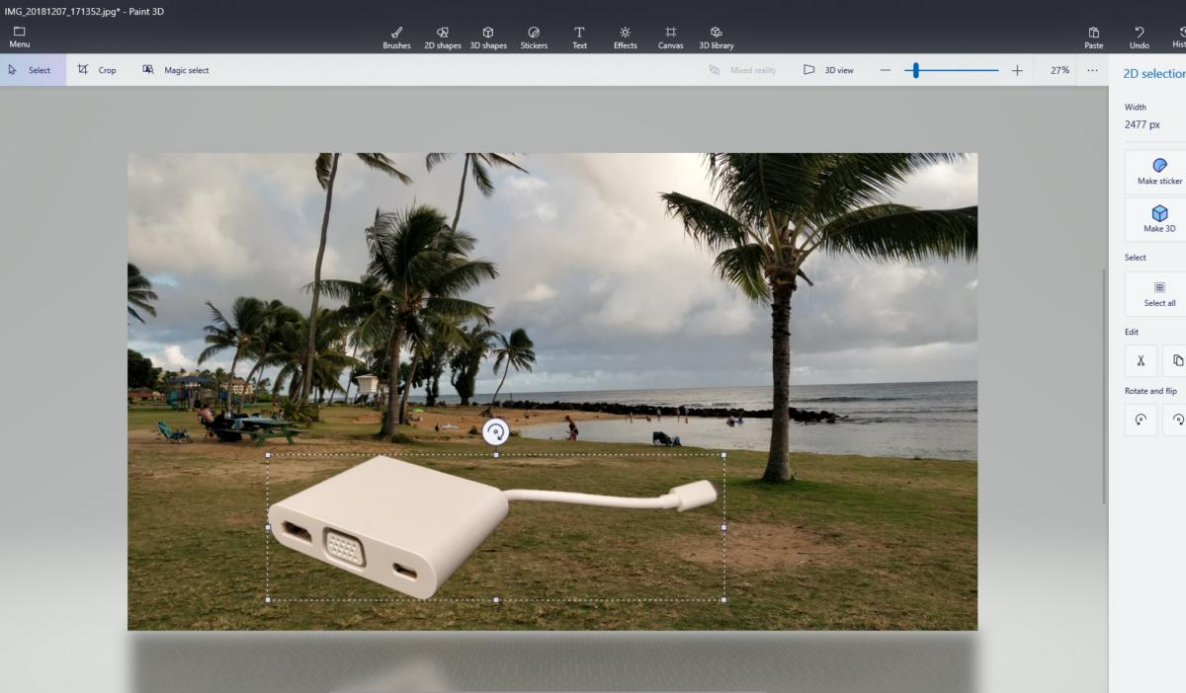

FAQs
1. Why does Magic Select leave parts of the background or cut off parts of my subject?
Magic Select is an AI-based tool that separates the subject and the background, yet it is not always precise. The tool can be confused by similar colors or complicated edges, such as hair, and leave the gaps or cut off sections. That is why the tool has Add and Remove brushes, which allow you to correct the mistakes, either by painting over the missing part or the background that you do not want.
2. Can I use the object I removed from the background in other programs?
There are two ways of using your cutout in other programs. It would be best to save it in a transparent PNG, which can be used with Word, PowerPoint, Photoshop, etc. Or, in Microsoft applications, one can simply copy the object in Paint 3D and paste it directly into Word or PowerPoint (a quick solution). None of the files will require saving, and the transparency will be maintained.
3. What is the best image format to use for background removal in Paint 3D?
For best results, start with a high-quality JPG or PNG so Magic Select has sufficient detail for a clean cutout. When saving, always choose PNG. It is the only format that maintains transparency. By saving as JPG, the clear sections would transform into solid white, which would reverse the process of removing the background.
Final Word
So, here’s your answer to, “How do I remove the background of a picture for free and without technical steps?” Paint 3D can remove background in a few steps with its “Magic Select” tool. One can cut out items, keep them with clear backdrops, and move them to new scenes. To get the most success, make sure that you use clear images and spend time on improving the edges. In case more editing is desired, such as refining or artistic effects, an AI Enhancer like Tenorshare PixPretty is an excellent pick.
PixPretty AI Photo Editor
- 100% free AI Image Generator (Nano Banana 2 powered)
- 4K image quality with fast generation speed
- AI effects & filters for personal and e-commerce use

Related Articles:


